Wednesday, November 25, 2020

Friday, November 20, 2020 -- Manhattan Beach Pier - Surf's Up

The surf is pretty big today.  A lot of people out on the water...


Much less wind than yesterday (see the flag).


Marine layer is rolling in.
Can't really see Palos Verdes Peninsula.


Tuesday, November 24, 2020

Old & Rough Tool Case - part 33 -- Cleaned & installed top rear corner protectors

I got tired of hand cleaning the corner protectors using steel wool.
I decided to use a steel wheel on the two rear ones.
This is after the cleaning.
It's a little bit more shiny than the fronts (there's a little bit of patina left but not as much as on the fronts).


This is the power wheel that I used.
The right side is a coarse steel wire wheel.
It's an old grinder and after I cleaned the corners, it stopped working.  A little bit of acrid smoke too...
Will take it apart one of these days to see what happened inside.
It may be toast...


Installed the left rear one...


And the right rear...  Done.
Decided to not do the bottom corner protectors for now.
When I either fix the grinder or get another one, I'll use the steel wire wheel to do the bottom corner protectors...


Thursday, November 19, 2020 -- Manhattan Beach Pier - Rough Waves & Windy

The ocean is a bit on the rough side today.  Looks like decent waves too...


The flag shows how the wind is stiff today.
It was tough, riding against it, going back home...


Broken Toaster/Oven -- Part 3 and last -- Installed the new switch & cleaned. Done...

De-soldered the white wire from the old broken timer.

I'm a little surprised that the power wires are soldered to the timer switch, instead of using connectors.

Used an old Weller soldering gun.  Worked  well.

The old timer switch had some broken plastic inside.
The red arrows point to a plastic "wall" inside the switch that had broken into pieces.
Probably the root cause of the timer switch not working...

New timer soldered in.

This is the correct position/orientation of the switch.

Put the front cover on loosely and attached the switch and the selector.

There's some debris on the bottom of the unit.
Using a putty knife, this area was cleaned before installing what goes over this area.

On the bottom on the unit, installed this piece that holds the removable debris tray in place, with four screws.

The tray holder was installed.  In total, there's fourteen screws that go on the bottom of this unit (!)

After finishing assembling all the pieces (including the back panel), spent some time cleaning the exterior of the toaster.
Also cleaned the glass on the front door.
Took more time to clean the toaster than to install the new timer switch and reassemble the unit...

Toaster back where it normally lives on the kitchen counter.

There's three heating elements on this toaster.
They look kinda like fluorescent tubes but in this case, they get very hot & glow orange when energized (like in the picture below).
The selector switch allows you to turn on the top rack area, the bottom rack area or both areas at the same time.


Monday, November 23, 2020

Noisy bathroom ventilation fan -- Part 3 of 2 -- Installed the fan cover...

Cover came today (Amazon).


Well travelled...


Nicely packaged (cardboard insert to protect the metal clips & unit inside a foam sleeve).  No damage...

There's a recess in the center for a name brand sticker...

Installed.  Done.


Old & Rough Tool Case - part 32 -- Cleaned & installed top front corner protectors

Decided to leave a little bit of "patina" on the top front left corner protector.
Before installing the two screws.


After installing the screws.
Just the right amount of patina left on the metal.


The very rusty part is the top front right side corner protector, before using steel wool on it.

Close-up showing the rough rusty surface...


Used steel wool to remove most of the rust.
It's a very tiring process using elbow grease...

The two top front corner protectors are done...


Wednesday, November 18, 2020 -- Manhattan Beach Pier - Took the trees away...

They had placed Christmas trees all along the pier.
Now they're gone...?


Musubi & Karage...

Eric came by in the afternoon to pick up some paperwork.
He brought some food...  Nice of him.

Had the rice ball (really a triangle... call a "rice musubi") and the chicken karage (basically Japanese fried chicken) as part of dinner.
Pretty good!


Friday, November 20, 2020

Broken Toaster/Oven -- Part 2 -- replacement timer arrived...

The replacement timer came in the mail today.


The part came from Florence, Kentucky.
When I worked for Toyota, I made many visits to Erlanger, Kentucky; basically the same area as Florence (Cincinnati suburb).
The Main North American Quality Center for Toyota was in Erlanger.

Since the reorganization (about 6 years ago -- I left Toyota about 5.5 years ago...), I don't know how/where the main quality group is now organized or where it's been moved to...
I know one guy I used to work with who moved to Plano, TX, and has since retired and moved back to his house in SoCal...

Also visited the Toyota plant in Kentucky several times.  They built the Camry & Avalon and had just added the Lexus ES350 when I left the company...  Seems like a lifetime ago...


Visually, the new timer looks pretty much the same as the old one (a few minor manufacturing differences on the outside).
Will probably install it this weekend and reassemble the unit.  Hopefully it will go back together OK and work...


Noisy bathroom ventilation fan -- Part 2 of 2

The new unit arrived (Amazon).
No labels on the unit.


The motor has a label (made in Vietnam).
The original motor was rated at 1.3A at 1625 RPM.
This one is rated at 0.48A at 1620 RPM.
I think the difference is the energy efficiency of the motor.
At 1620 RPM, the air flow rate should be the same (about 110 CFM).


The "cage" bracket for the motor is spot welded to the base plate on both ends with three spots.
The original unit also was spot weleded with three spots.


This unit has a soft start feature that the original didn't.
The grey item appears to be a capacitor for the soft start.


Side view of the unit.


The markings on the plastic fan appear to be exactly the same as the old unit's...


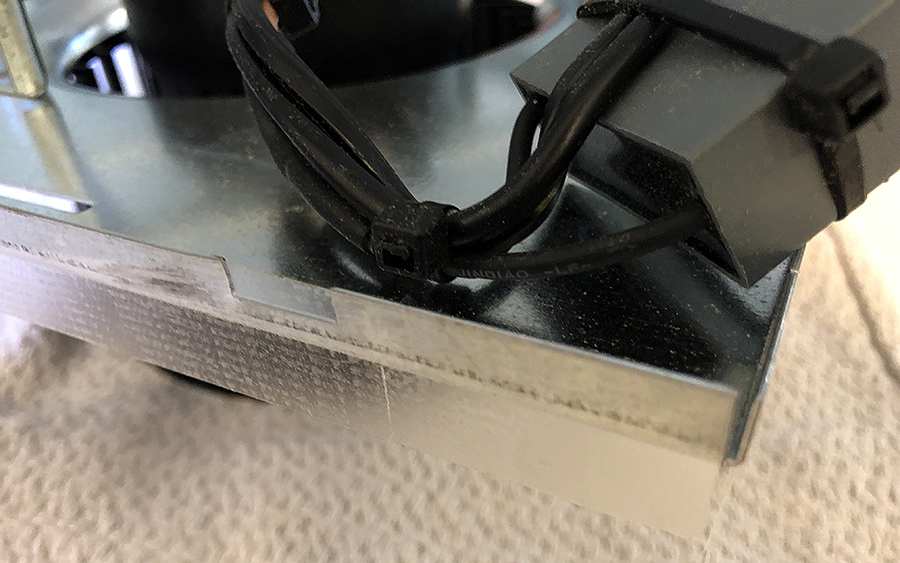
Applying two sided tape to the flanges.


Then, applied a Teflon tape on top of the double sided tape (for better adhesion).  The idea is to put something between the metal flanges and the metal housing to prevent any rattles from metal-to-metal contact.


The double sided tape on the left and the Teflon tape on the right...


Unit as installed.  It's a little bit quieter than the old unit.
The big difference is that the old unit would make an abnormal metallic noise.  The noise was intermittent but present most of the time...
No more metallic rattle noise.

The new plastic cover for the unit should arrive tomorrow (also Amazon).


This is the old cover.
It's not broken but the metal retaining springs are heavily corroded and the plastic has yellowed and stained...