Monday, January 4, 2021

Adjusting the rear brake pads...

The right rear brake pad is way out of alignment...


After adjusting...


The left rear brake pad is a little bit high but not too bad.


After adjusting...

Also adjusted the brake cable to minimize the air gap for a more responsive brake lever.


Sunday, January 3, 2021

Wednesday, December 30, 2020 -- Joshua Tree National Park -- Part 1


Dining table bench - part 2 -- Plane the top surface...


Turning this crew adjusts the tightness of the clamping action of the lever...


Lever loosen the blade assembly.


The knob at the back adjusts the depth of the cut.


Plane out most of the chatter marks...


Using the chisels to clean up the "live" edge...


Model kits in the small metal base cabinet...


Adjusting the front brake pads...

I had adjusted the brake pads to match the "Look" brand wheels I was using, before I swapped in the new rear cassette on the original Mavic wheels.
Now, all the pads need to be adjusted for the Mavic wheels.

This is the right front brake pad.
It's pretty out of position...


This is the right front pad after adjusting.
Now it's centered pretty well on the braking surface on the wheel.


This is the Left Front brake pad.
It's not too bad but is adjusted too high.


After adjusting, the pad is now centered on the braking surface on the wheel.


The rear of the pad is also centered on the braking surface.
I didn't take pictures but I also adjusted the brake cable so that the gap between the pads and the wheel is smaller.
This results is less "dead" response to the brake lever when pulled.
Basically, you want to adjust the brakes so that the pads are as close as possible to the wheel while not rubbing at all when the brakes are not applied.
The more "true" the wheel is, the smaller the gap can be.


Saturday, January 2, 2021

Sunday, December 27, 2020 -- Manhattan Beach Pier


It's a beautiful weather day (low 70s F) & the Sunday after Christmas.
The bike path and the pier area was pretty busy...


The guy in the SKY "kit" has some of the deepest wheels I've seen.
They look like 80 to 90 mm deep.
In a cross wind, it would be pretty tough to go in a straight line & could cause you to crash on a narrow bike path...


Lights for the back yard...

I had removed this light assembly from the back yard a long time ago (several years!).
I remember I removed it because something wasn't working on it.
Can't remember what!

It hangs near the concrete patch where the pergola used to be.
The pergola wood had gotten rotten so I removed it about a year ago...

Finally got the motivation to put it back & fix whatever is wrong with it.


The upper red arrow points to the circuit breaker for the outdoor light that's attached to the house.
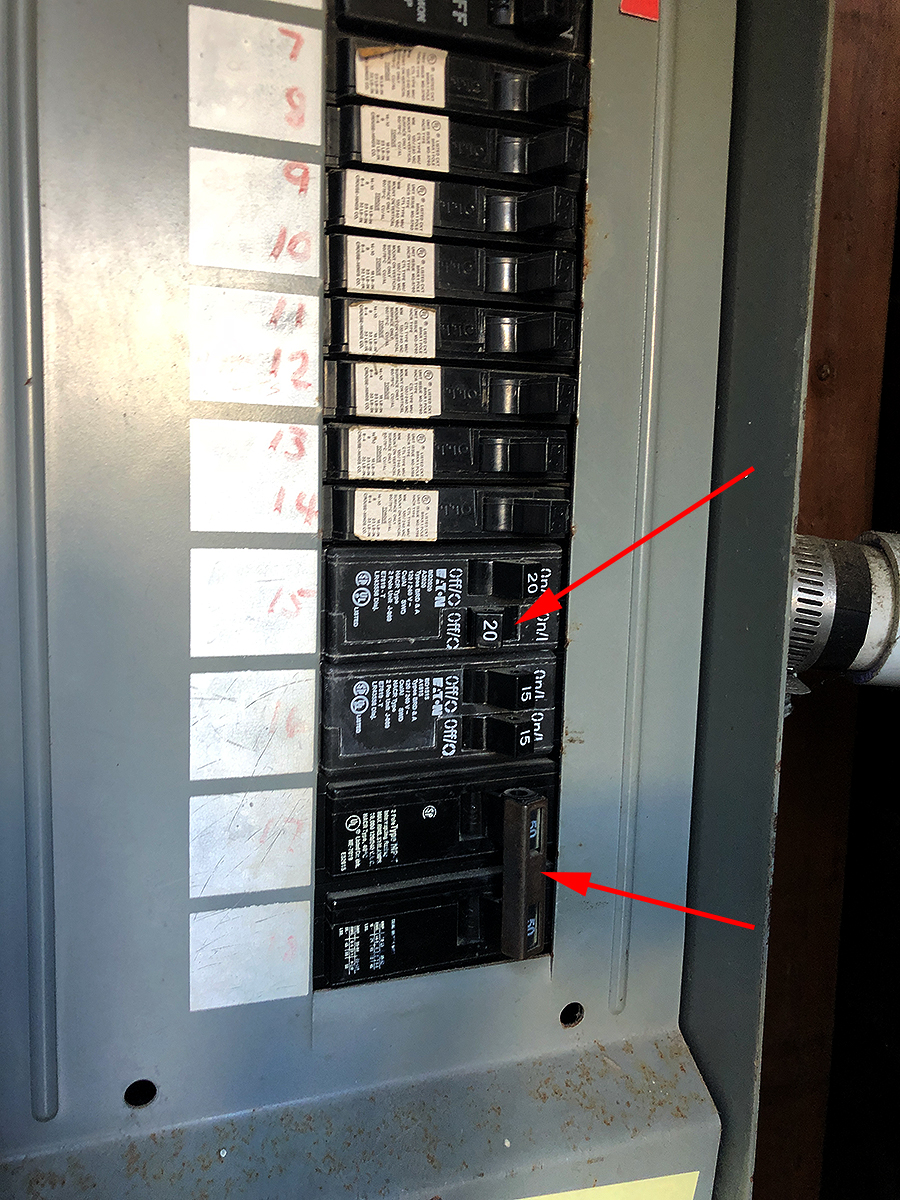
The bottom red arrow points to the 220V circuit that goes to the garage.
The pergola area light is wired into the garage so the garage circuit breaker (bottom red arrow) has to be on for the pergola light to work.


After installing the light, only one of the two bulbs lit up.


The bulb is burn't out.
It says GY63 on the bulb.
Went to the local hardware store & found the same type of bulb for 120V (there was a very similar bulb with the same number for a 12V system also...).

 Installed the new bulb.