Friday, December 25, 2020

Replacing the rear cassette on the Cannondale -- part 1 -- Removing the old worn cassette

I bought a slightly used cassette.
According to the seller, it was used for a couple of weeks only.
Even came in the original packaging.


Ultegra 10 speed, 11-28 teeth.


There's the slightest marks of use.
It's almost new & very clean.


Used a chain whip tool to hold the cassette while loosening the locking ring with the special tool.
The special tool has a 1" hex head.


The lock ring is completely loose at this point.
Once the locking ring is off, the cassette can simply be slid off as a unit...


This in the inner side of the lock ring.
Amazingly dirty and full of sand...


The back of the original gear cluster is packed with sand and dirt!


The rear hub spline area is also very dirty.
Will need to thoroughly clean this area before installing the new cassette...


Comparison of the old and the new.
I think the old cassette was 10 - 23 teeth.
It's great for having very small jumps between the gears but when going up steep hills, the largest ring is not large enough.
The new cassette with the 11 to 28 teeth range is better for climbing.
The only problem is that the original rear derailleur may not have a long enough freewheel cage to move the chain up to the 28 teeth gear.
Will find out later when installed...


The quality of the Ultegra components are nearly as good as the Dura Ace.
The significant difference is in weight (Dura Ace being slightly lighter).
Some think that the Ultegra components are more durable than Dura Ace.  I'm not so sure but both are very good quality.


Both the Dura Ace and Ultegra lock rings are made in Japan.


Thursday, December 24, 2020

Monday, December 21, 2020 -- Manhattan Beach Pier - Beautiful day...

It's a beautiful warm day (high in the upper 70s F).
Catalina...


Windy on the way back...

Lots of people out riding and jogging...


Charging the battery on the MGB...

The battery is located behind the seats.
There's four 1/4 turn fasteners on the metal panel covering the battery location.


The car originally had two 6 Volt batteries in series (to create 12 V).
The previous owner swapped the two batteries for one 12 V battery, so the other battery compartment is empty.
I should remove the redundant battery wire...

Someone also put a piece of Dynamat (noise and vibration damping material) on the bottom of the metal cover.

I charge the battery at 2A (slow charge) over many hours.
This is the most gentle on the battery.


Finished Trimming the two ficus trees in the front of the house...

This was the "in process" where I had trimmed the bottom areas a couple of weeks ago...

Nearly finished trimming.
After this picture, trimmed the left tree some more...

Finished... until next time...

Biking Shoe Repair -- Bodge #2...

The two-part adhesive seems to be working, for now.


After one ride, no separation...


Wednesday, December 23, 2020

Starter Replacement on the MGB

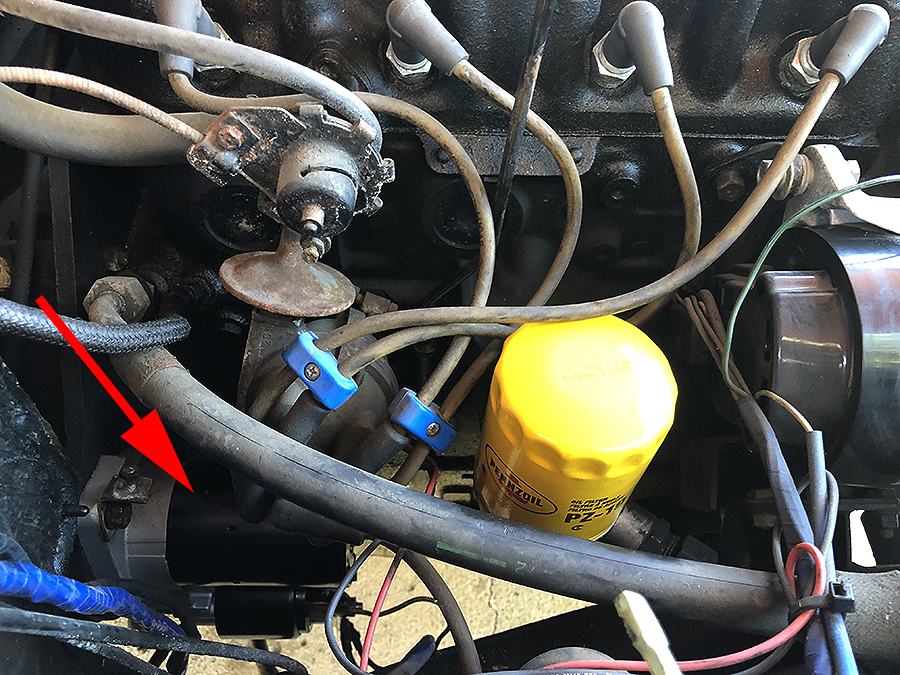
The upper arrow is pointing to the upper mounting bolt for the starter.
The lower arrow is pointing to a ground stud that's on a bracket that goes behind the upper starter mounting bolt.

My guess is that this ground was used for the original wiring harness.  But, is not used now.  The car had a wiring fire and the previous owner replaced much of the wiring harness on the car (especially in the engine bay).  The new wiring is easy to pick out by the blue tape wrapping...


This bolt is about 9/16" but a socket is somewhat loose on the bolt.
I used a special socket that can accommodate the loose fit without rounding the bolt.

It's strange that the bolt is not exactly 9/16"...  The bottom bolt is exactly 9/16" and a normal socket worked perfectly...


This is the lower mounting bolt for the starter.  Access is a little bit tough with a socket/ratchet but with the right swivel and extension, it worked out OK.

Fortunately, both bolts were not stuck and came off relatively easily.


The old starter may actually be the starter that originally came with the car.  It's a Lucas brand, which was the main supplier for most of the electrical components on the car.

The replacement starter has a different arrangement of the two spade connectors.
As can be seen in the picture, only one of the two connections is used by the wiring.


This is the new starter, as installed.
The new starter is much smaller and lighter than the original.
It's also equipped with a reduction gear setup to more easily spin up and turn/start the engine (progress...).

The red arrows point to the wiring installed to the new starter.


There's four different connectors.
As can be seen below, the spade connector was mounted to the upper location.

The other spade connection point is on the other side of the solenoid (unlike the original starter which has the two spade connections next to each other).


The lower starter mounting bolt.  Because the new starter is smaller, installing the lower bolt was a bit easier (more space).


Looking down at the passenger side of the engine bay.
The starter is about 25% smaller and lighter...


I checked the condition of the gear teeth on the flywheel, just using my hand.
The section that I can access through the starter hole seemed OK.  No chipped or missing teeth...


The new starter as installed, as viewed from below

And from above...


The old starter & old filter...


All done for now.
Car lives on the street...

Don't care for the luggage rack but don't want to have the exposed holes if I remove it...
I could just plug the holes with some rubber or chrome caps...

I wonder if they make a bike rack that fits on the luggage rack?
Maybe I can adapt a roof-top bike rack to fit on the luggage rack...?


Sunday, December 20, 2020 -- 20 MPH -- Manhattan Beach Pier

Finally averaged 20 MPH for the ride to the Pier & back.


A lot of people out.  The pier area was busy and nearly all the benches were occupied.


A lot of people on the bike path.
The weather was beautiful and warm (high of 77 F today...).


New appliances for the kitchen...

New air fryer. (kinda like a small electric oven...)
Like the color/texture...
Makes great sweet potato fries...

Hot water pot.
The pot is not corded.
It sits on a base that has the electrical connections...
Nice...


Tuesday, December 22, 2020

Oil Change on the MGB

Getting ready for the oil change...


The oil filter is accessed from the top and very easy to remove.


Some oil spills when removing the filter (had a pan under the car).


The engine bay is coated with a fine layer of oil/dirt.
The oil fill cap (shiny chrome) is pretty slippery and difficult to turn with your hands.

Used some large adjustable pliers to remove the fill cap.
It wasn't that tight...


Cleaned the filter seal interface surface before installing the new filter.


The replacement filter that I bought is smaller than the one I removed but the fit is correct.

The engine took about 4.5 quarts of new oil.

 I'll order this filter for the next time.
I think the Penzoil filter that I installed is fine but this one is significantly larger...